
Profile & Settings
Manage your personal profile, business information, checkout page branding, and notification settings from the profile menu.
Profile & Settings is where you manage your personal account, your business information, your checkout page branding, and how Doitpay notifies you. It is reachable from the profile avatar in the top right corner of the dashboard.
Accessing Profile & Settings
Click your profile avatar (the circle with your initial) in the top right corner of any page. The menu shows your name, your email, and your current business, then these entries:
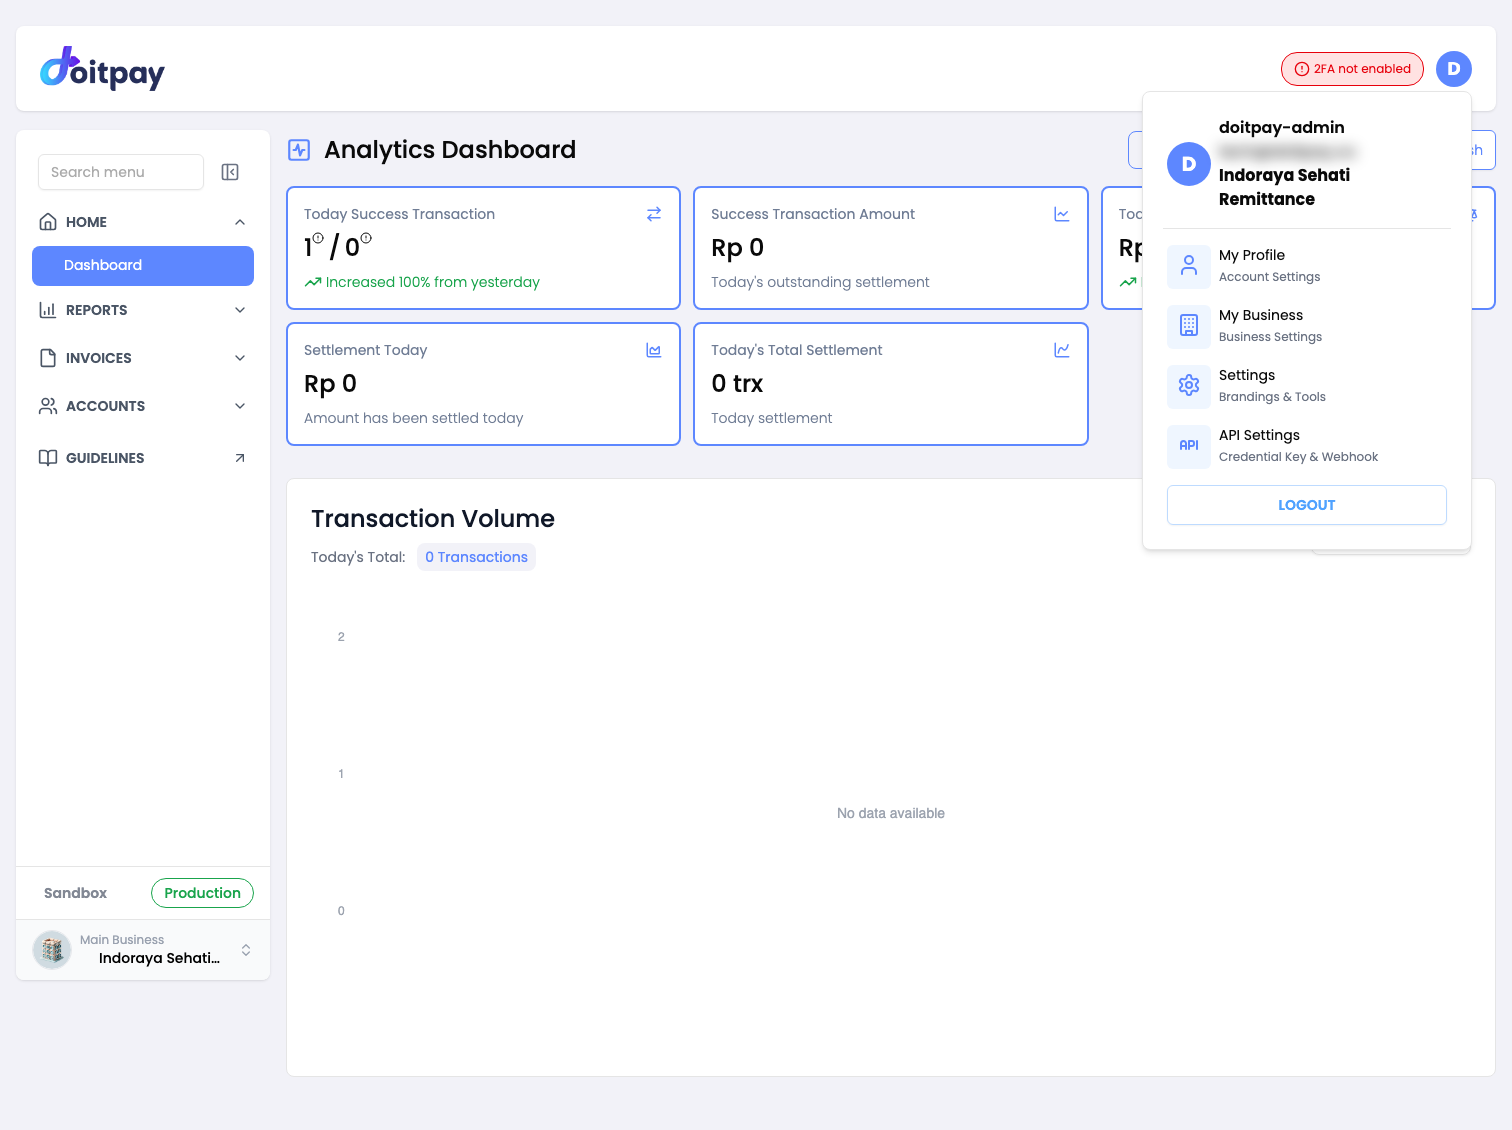
| Menu item | Opens |
|---|---|
| My Profile (Account Settings) | Your personal profile, password, and 2FA |
| My Business (Business Settings) | Your business details and the users list |
| Settings (Brandings & Tools) | Checkout page branding |
| API Settings (Credential Key & Webhook) | API credentials and webhooks |
| Logout | Sign out of your account |
Every entry opens the same Profile area, which has four tabs across the top.
| Tab | URL |
|---|---|
| Profile | /profile |
| Business | /business-profile |
| Settings | /settings |
| Manage Notifications | /manage-notifications |
You can move between the tabs at any time. The tabs share one page header, and the 2FA warning stays visible across all of them until 2FA is enabled.
Tip
The tabs are separate URLs, so you can bookmark or share a direct link to any of them. For example, bookmark /manage-notifications if that is the page you use most.
Profile Tab
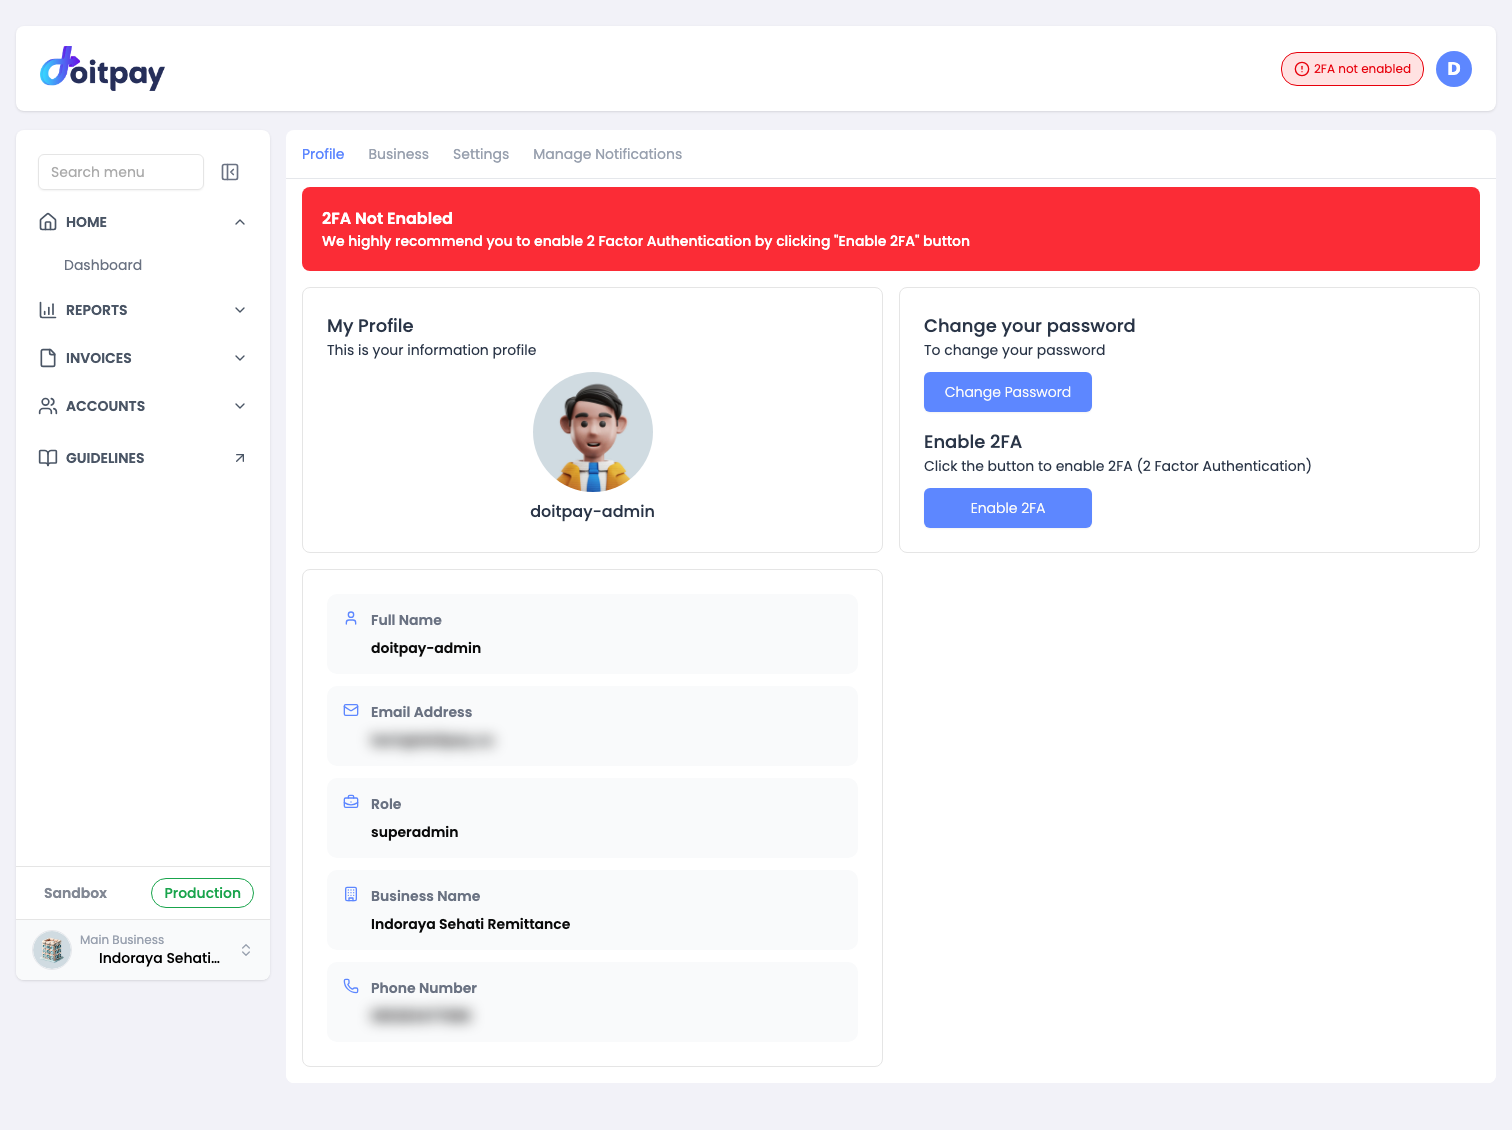
The Profile tab shows your personal account information.
| Field | What it shows |
|---|---|
| Full Name | Your display name in the dashboard |
| Email Address | Your registered login email |
| Role | Your permission level, for example superadmin or operator |
| Business Name | The business you are currently signed in to |
| Phone Number | Your registered phone number |
Change Password
The Change your password card has a Change Password button. Click it to open the password form and set a new login password.
Two-Factor Authentication
The Enable 2FA card shows the status of two-factor authentication on your account and gives you a button to act on it.
While 2FA is off you see two reminders. A red banner sits at the top of the page reading 2FA Not Enabled, and a status pill in the header reads 2FA not enabled. Both clear once 2FA is set up.
| State | What you see | What to do |
|---|---|---|
| Disabled | 2FA not enabled warning pill and an Enable 2FA button | Click Enable 2FA and follow the setup steps in your authenticator app |
| Enabled | The warning pill is gone and a Reset 2FA action is available | Use Reset 2FA if you change phones or lose access to your authenticator app |
Security Tip
Enabling 2FA is strongly recommended. It protects your account even if your password is exposed. Security related emails cannot be turned off, so you always keep a record of account activity.
Business Tab
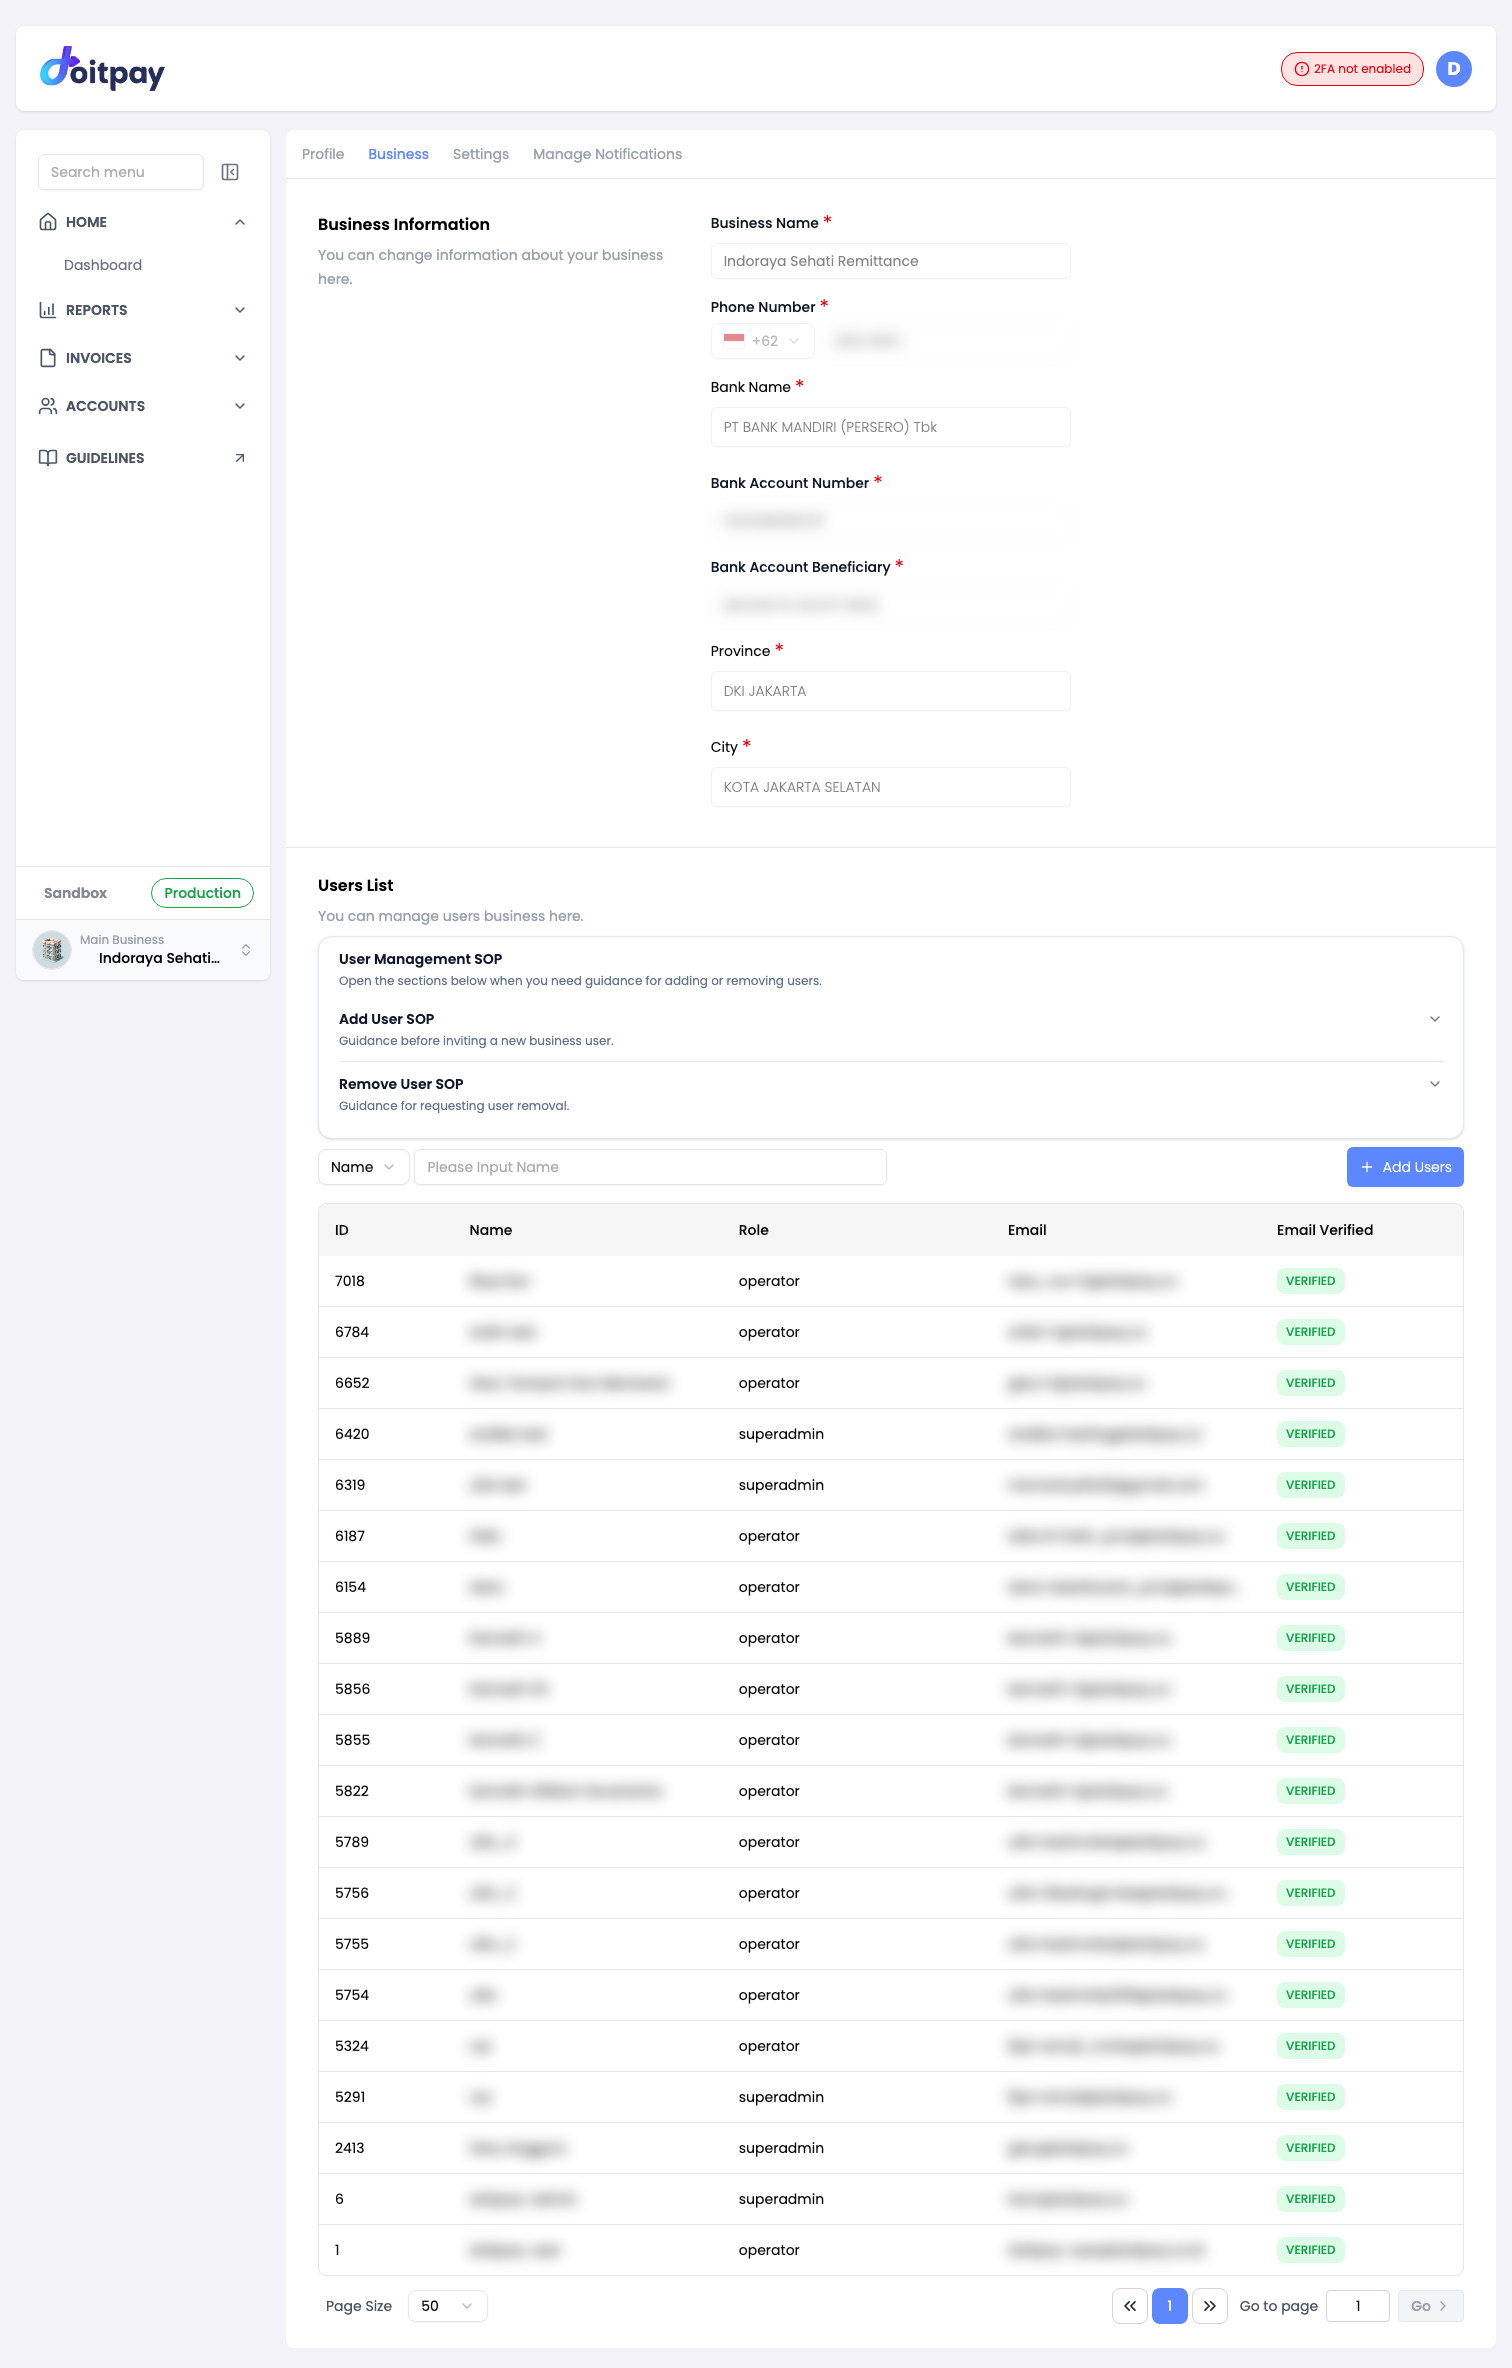
The Business tab covers two things: your business information and the people who can access it.
Business Information
The heading reads You can change information about your business here. These fields describe your business and the bank account used for settlement.
| Field | What it shows |
|---|---|
| Business Name | Your registered business name |
| Phone Number | Business contact number, with country code |
| Bank Name | Bank used for settlement payouts |
| Bank Account Number | Account number for settlement |
| Bank Account Beneficiary | Name registered on the bank account |
| Province | Business province |
| City | Business city or district |
Changing business details
The fields on this tab are shown for reference and are read only in the dashboard. Bank and identity details are locked because they affect where your money is settled. To change any of them, contact Doitpay support and they will update the record for you.
Users List
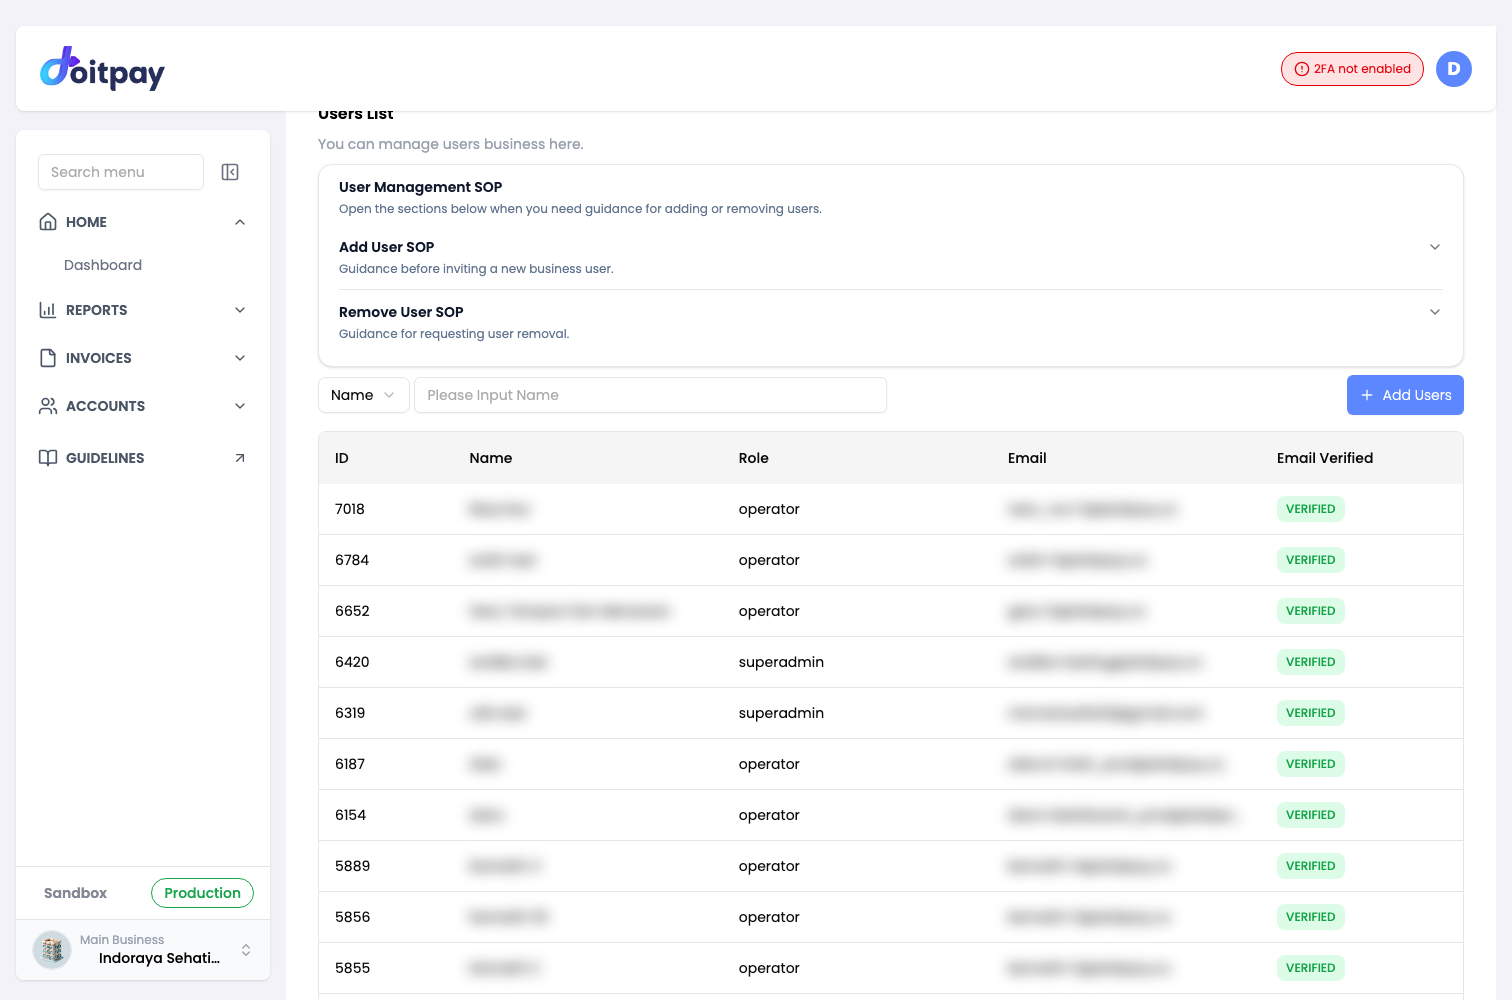
The heading reads You can manage users business here. This section lists everyone with access to the current business.
| Column | What it shows |
|---|---|
| ID | Unique user ID |
| Name | The user's display name |
| Role | Permission level, for example superadmin or operator |
| Registered email address | |
| Email Verified | Shows VERIFIED once the user has confirmed their email |
Use the search field at the top of the list to filter by name. The dropdown next to it selects the field you are searching on.
Click + Add Users to invite someone new to the business.
User Management SOP
Above the users list sits a User Management SOP panel. It holds the written procedures for user changes so you do not have to raise a ticket to find out what to do.
| Section | Covers |
|---|---|
| Add User SOP | Guidance before inviting a new business user |
| Remove User SOP | Guidance for requesting user removal |
Open the section you need and follow the steps.
Adding a New User
Click + Add Users to open the Invite User Business dialog.
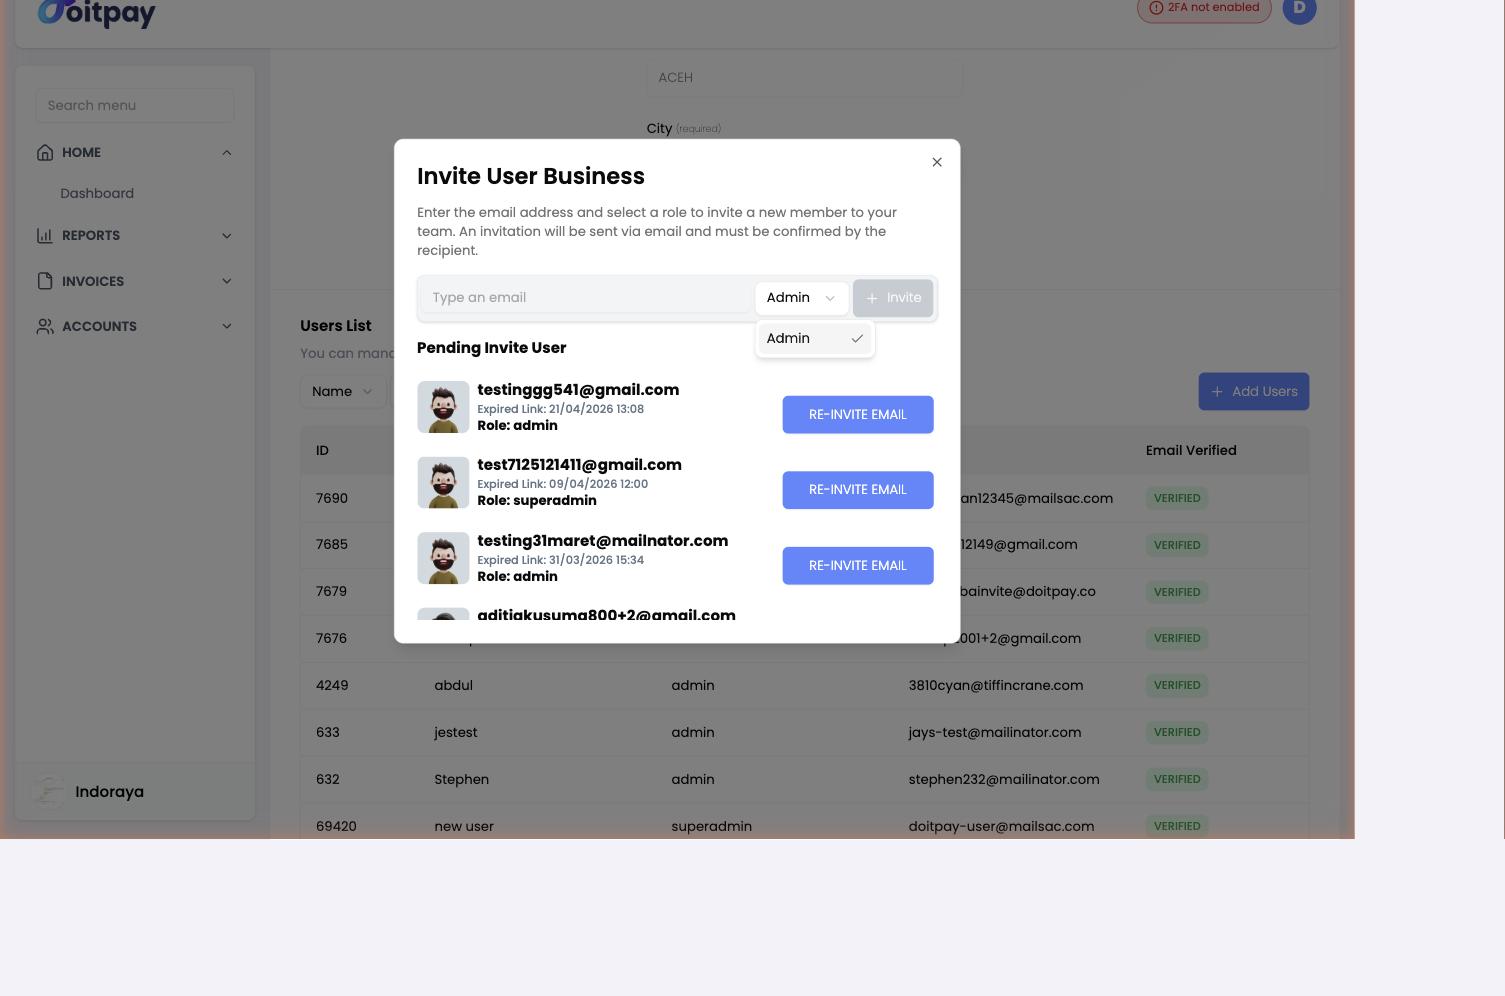
| Field | Description |
|---|---|
| The address the invitation is sent to | |
| Role | The permission level the new user receives |
Click Invite to send the invitation. The button stays disabled until a valid email address is entered.
An invitation email goes to that address. The person must open the link and complete registration before they appear in the users list.
Invitation Link Expiry
Invitation links expire. If the link is not used in time, resend it from the Pending Invite User section.
Pending Invite User
Below the invite form, Pending Invite User lists invitations that have not been accepted yet.
| Field | What it shows |
|---|---|
| The address the invitation was sent to | |
| Expired Link | When the invitation link expired, or will expire |
| Role | The role assigned to the invited user |
If a link has expired, click RE-INVITE EMAIL on that row to send a fresh invitation.
Adding a New User
To add a new user to your business, click the + Add Users button at the top-right of the Users List section. This opens the Invite User Business dialog.
How to invite a user:
- Enter the new user's email address in the text field
- Select a role from the dropdown (e.g., Admin)
- Click the + Invite button to send the invitation
An invitation email will be sent to the provided email address. The recipient must click the link in the email to confirm and complete their registration.
Invitation Link Expiry
Invitation links expire after a set period. If a link expires before the user accepts, you can resend the invitation from the Pending Invite User section.
Pending Invite User
Below the invite form, the Pending Invite User section lists all outstanding invitations that have not yet been accepted. Each entry shows:
| Field | Description |
|---|---|
| The email address the invitation was sent to | |
| Expired Link | The date and time the invitation link expired (or will expire) |
| Role | The role assigned to the invited user |
If an invitation has expired, click the RE-INVITE EMAIL button next to the entry to send a new invitation email to the same user with a fresh link.
Settings Tab
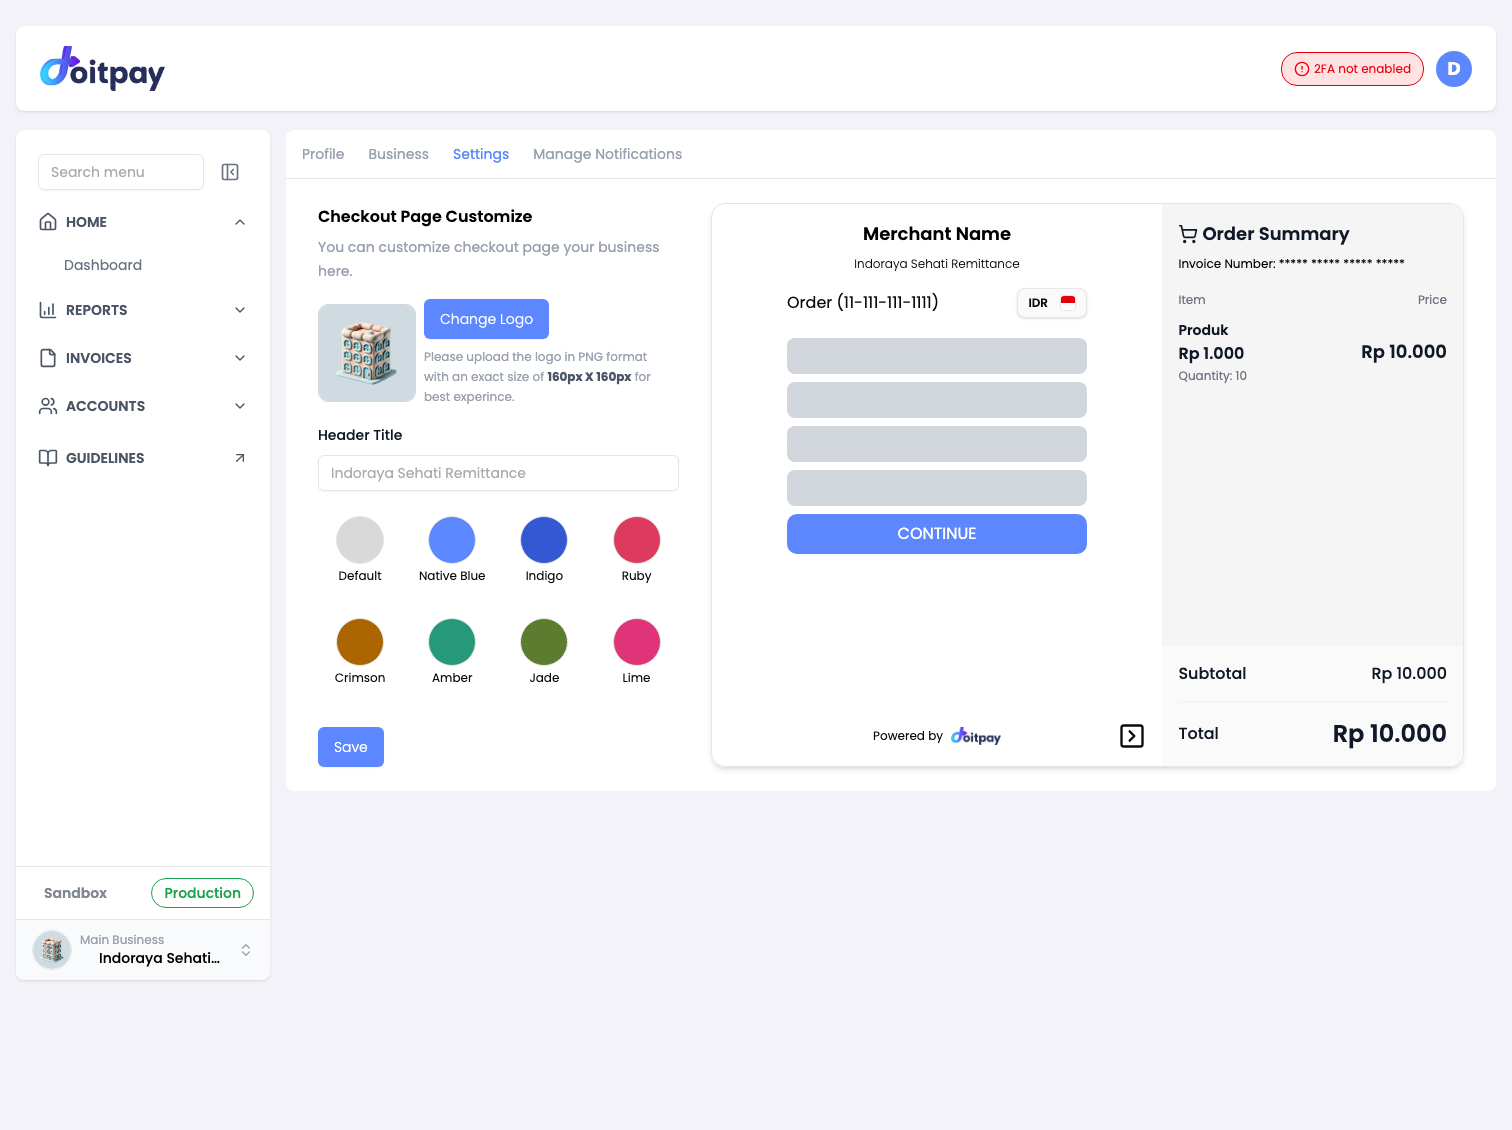
The heading reads You can customize checkout page your business here. Everything on this tab changes what your customers see on the Doitpay hosted checkout page, the page they land on from a Payment Link.
Logo
The current logo is shown on the left. Click Change Logo to upload a new one.
Use a PNG file at exactly 160px x 160px. That size renders cleanly and keeps the header aligned. A logo of a different shape may look stretched or cropped.
Header Title
Enter the text that appears as the heading at the top of the checkout page. Keep it short so it does not wrap on smaller screens.
Theme Color
Pick one of eight preset themes for the checkout page.
| Theme | Colour |
|---|---|
| Default | Light grey |
| Native Blue | Blue |
| Indigo | Dark blue |
| Ruby | Red |
| Crimson | Dark red |
| Amber | Orange |
| Jade | Dark green |
| Lime | Light green |
Live Preview
The panel on the right is a working preview of the checkout page. It shows your logo, your header title, the selected theme, and a sample order with an invoice number, an item, a quantity, a subtotal, and a total. It updates as you make changes, so you can see the result before saving.
Click Save to apply your changes.
Tip
Check the preview against a real order before you save. The preview uses sample values, so a long header title that fits there may still wrap on a real invoice with a long customer name.
Manage Notifications Tab
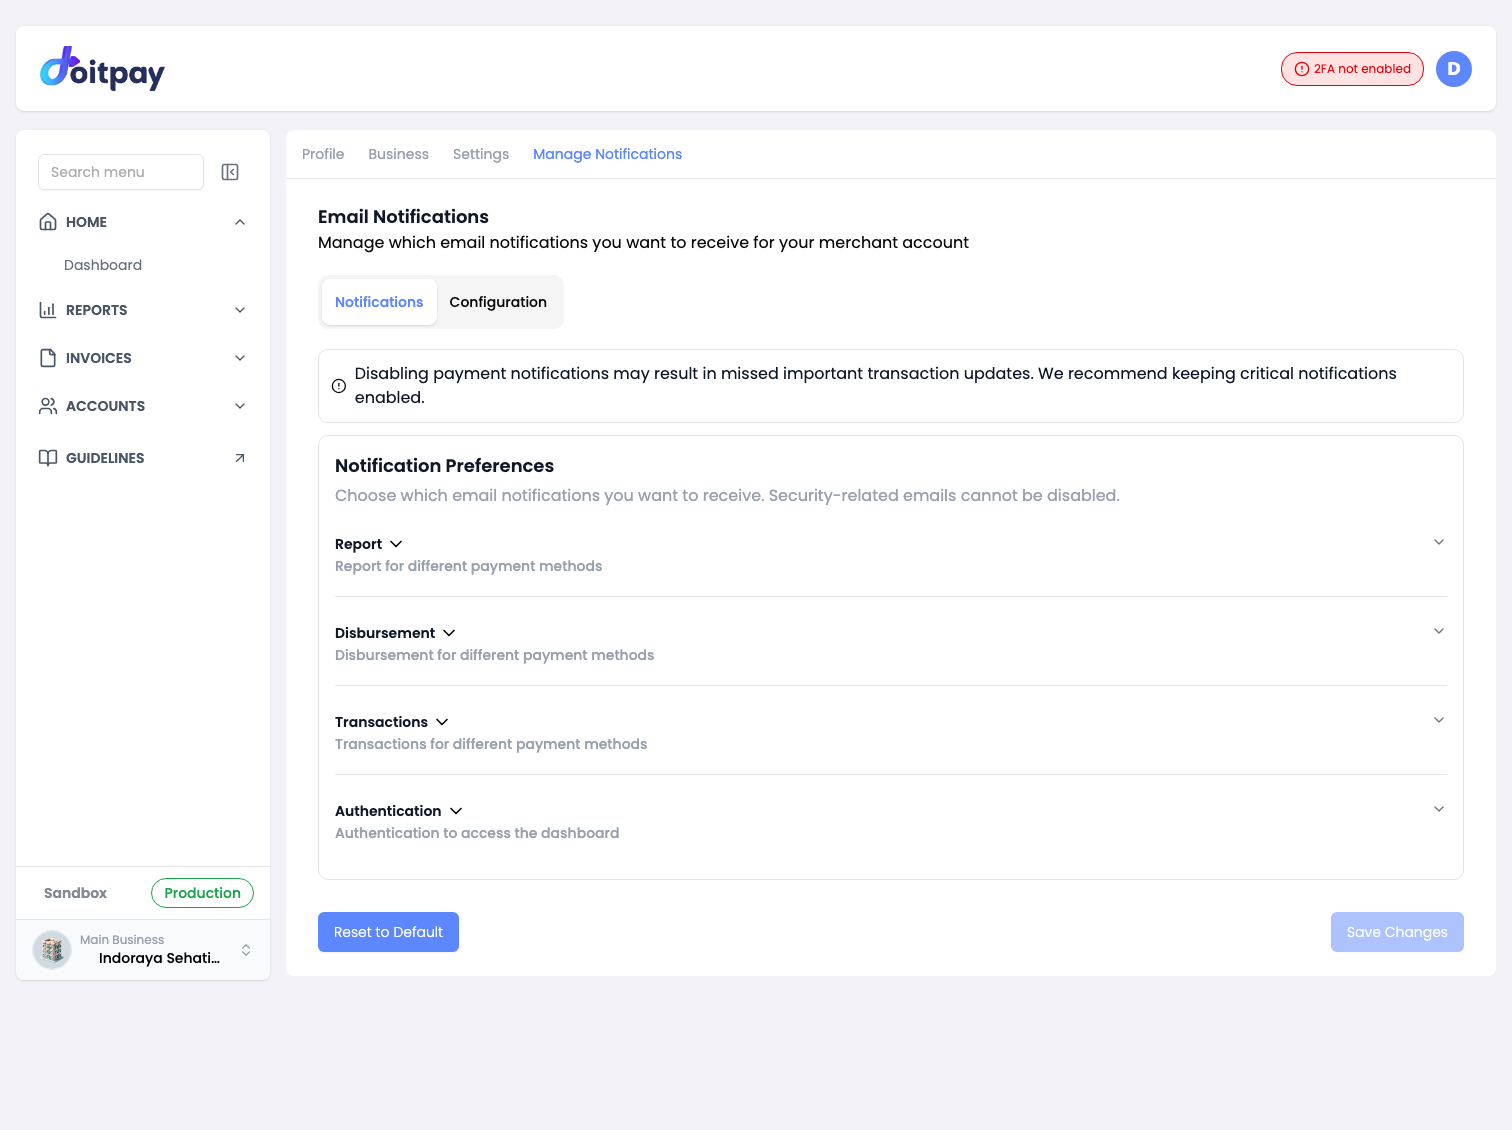
The heading reads Email Notifications and the subtitle is Manage which email notifications you want to receive for your merchant account.
This tab has two sub-tabs: Notifications and Configuration.
Important
Disabling payment notifications may result in missed important transaction updates. We recommend keeping critical notifications enabled.
Notifications Sub-tab
Notification Preferences controls which emails you receive. The subtitle notes that security related emails cannot be disabled.
Preferences are grouped into four collapsible sections. Open a section to turn individual notifications on or off.
| Group | What it covers |
|---|---|
| Report | Reports for different payment methods |
| Disbursement | Disbursement for different payment methods |
| Transactions | Transactions for different payment methods |
| Authentication | Authentication and dashboard access |
Click Save Changes to apply your selection. Click Reset to Default to restore the original settings.
Configuration Sub-tab
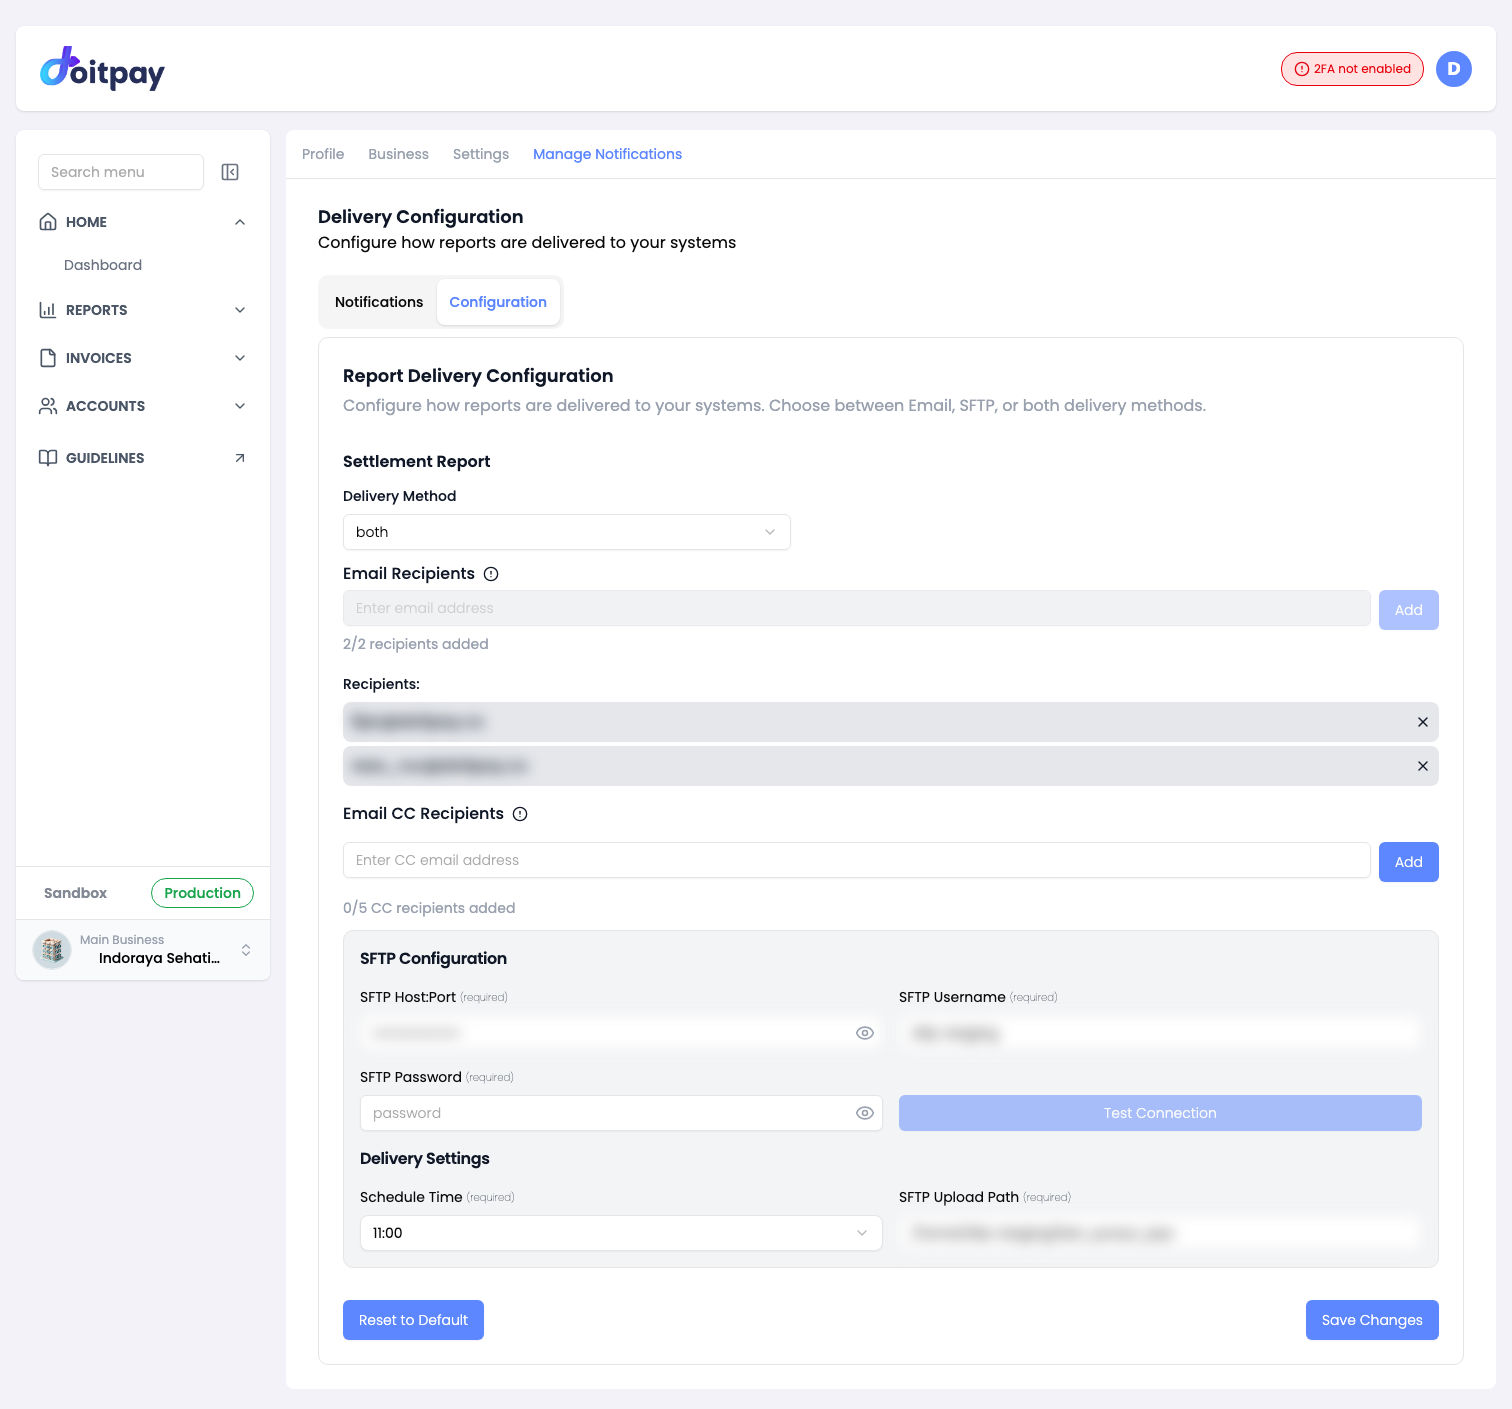
The heading reads Delivery Configuration and the subtitle is Configure how reports are delivered to your systems. This controls how your settlement reports reach you automatically, without anyone logging in to download them.
Settlement Report
Delivery Method chooses how the report travels. The three options are:
| Option | What happens |
|---|---|
| Reports are emailed to your recipients | |
| SFTP | Reports are pushed to your SFTP server |
| Both | Reports are sent by email and to your SFTP server |
When you select Email or Both, the recipient fields appear.
Email Recipients
Add the addresses that should receive reports.
- Type an address in the field
- Click Add
- The address appears as a chip below
The counter shows how many you have added, for example 1/2 recipients added. You can add up to 2 primary recipients.
To remove someone, click the x on their chip.
Email CC Recipients
Add addresses that should be copied on each report, for example your finance or accounting team.
The same steps apply. Type an address, click Add, and it appears as a chip. The counter shows 1/5 CC recipients added, so you can add up to 5 CC recipients.
Email versus CC
Recipients are the people who own the report. CC recipients are copied for visibility. Use Recipients for the team that acts on the settlement and CC for anyone who just needs the record.
SFTP Fields
Select SFTP or Both as the delivery method to reveal the SFTP connection fields.
| Field | Description |
|---|---|
| SFTP Host:Port | Your SFTP server address and port |
| SFTP Username | Username for SFTP authentication |
| SFTP Password | Password for SFTP authentication |
| SFTP Upload Path | Directory on your server where files are written |
| Schedule Time | Time of day the report is delivered, in 24 hour format |
Use Test Connection to confirm Doitpay can reach your SFTP server before you rely on it.
Click Save Changes to apply the configuration, or Reset to Default to start again.
Tip
Set the schedule time to land after your settlement has been posted. That way the report you receive already contains the day's settlement entries.
API Settings
For Independent Businesses
This section applies to independent business accounts that are not part of an account group. If your business belongs to an account group, API settings are managed from the Account Group page instead. See Account Group - Api Settings.
Open API Settings from the profile menu, or go straight to /api-settings.
The page has two tabs: Credential Key and Webhook Setting.
Credential Key
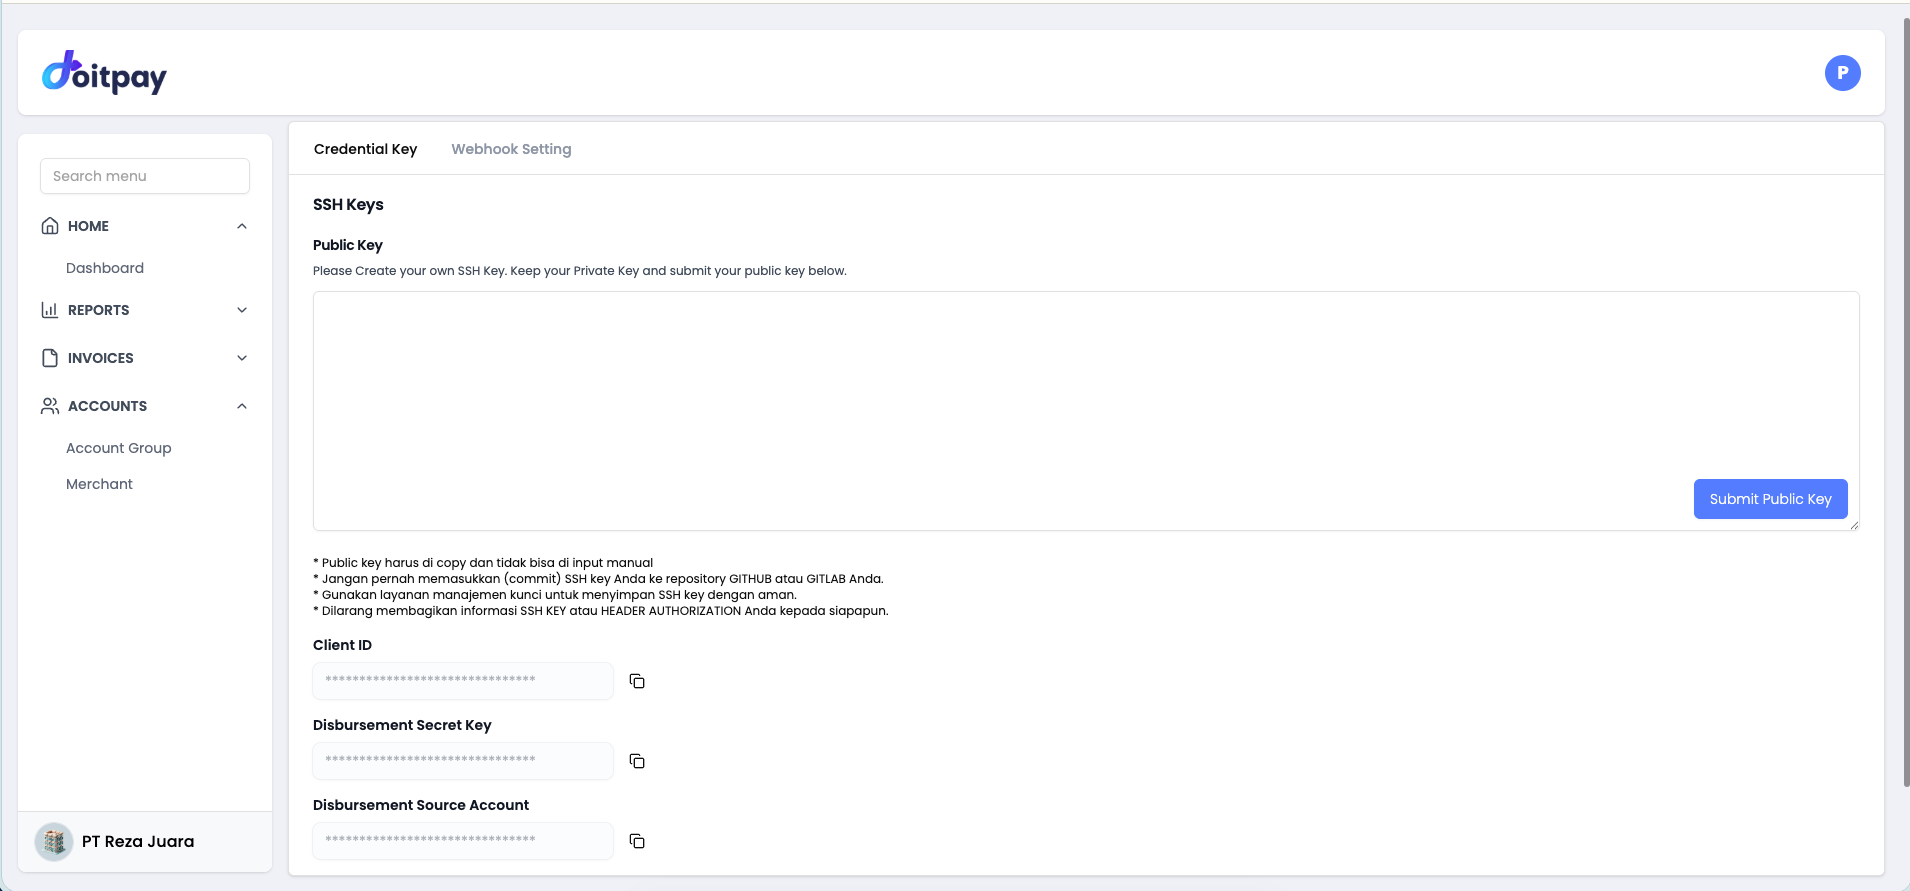
SSH Keys
To authenticate API requests you register your public key.
- Generate an SSH key pair on your own machine
- Copy your public key and paste it into the text area
- Click Submit Public Key
Security Notice
- The public key must be pasted, it cannot be typed by hand
- Never commit your SSH key to a GitHub or GitLab repository
- Store your keys in a key management service
- Never share your SSH key or header authorization value with anyone
API Credentials
| Field | Description |
|---|---|
| Client ID | Your client identifier for API authentication |
| Disbursement Secret Key | Secret used to sign disbursement requests |
| Disbursement Source Account | Source account used for disbursements |
Values are masked on screen. Use the copy icon next to a field to copy it.
Webhook Setting
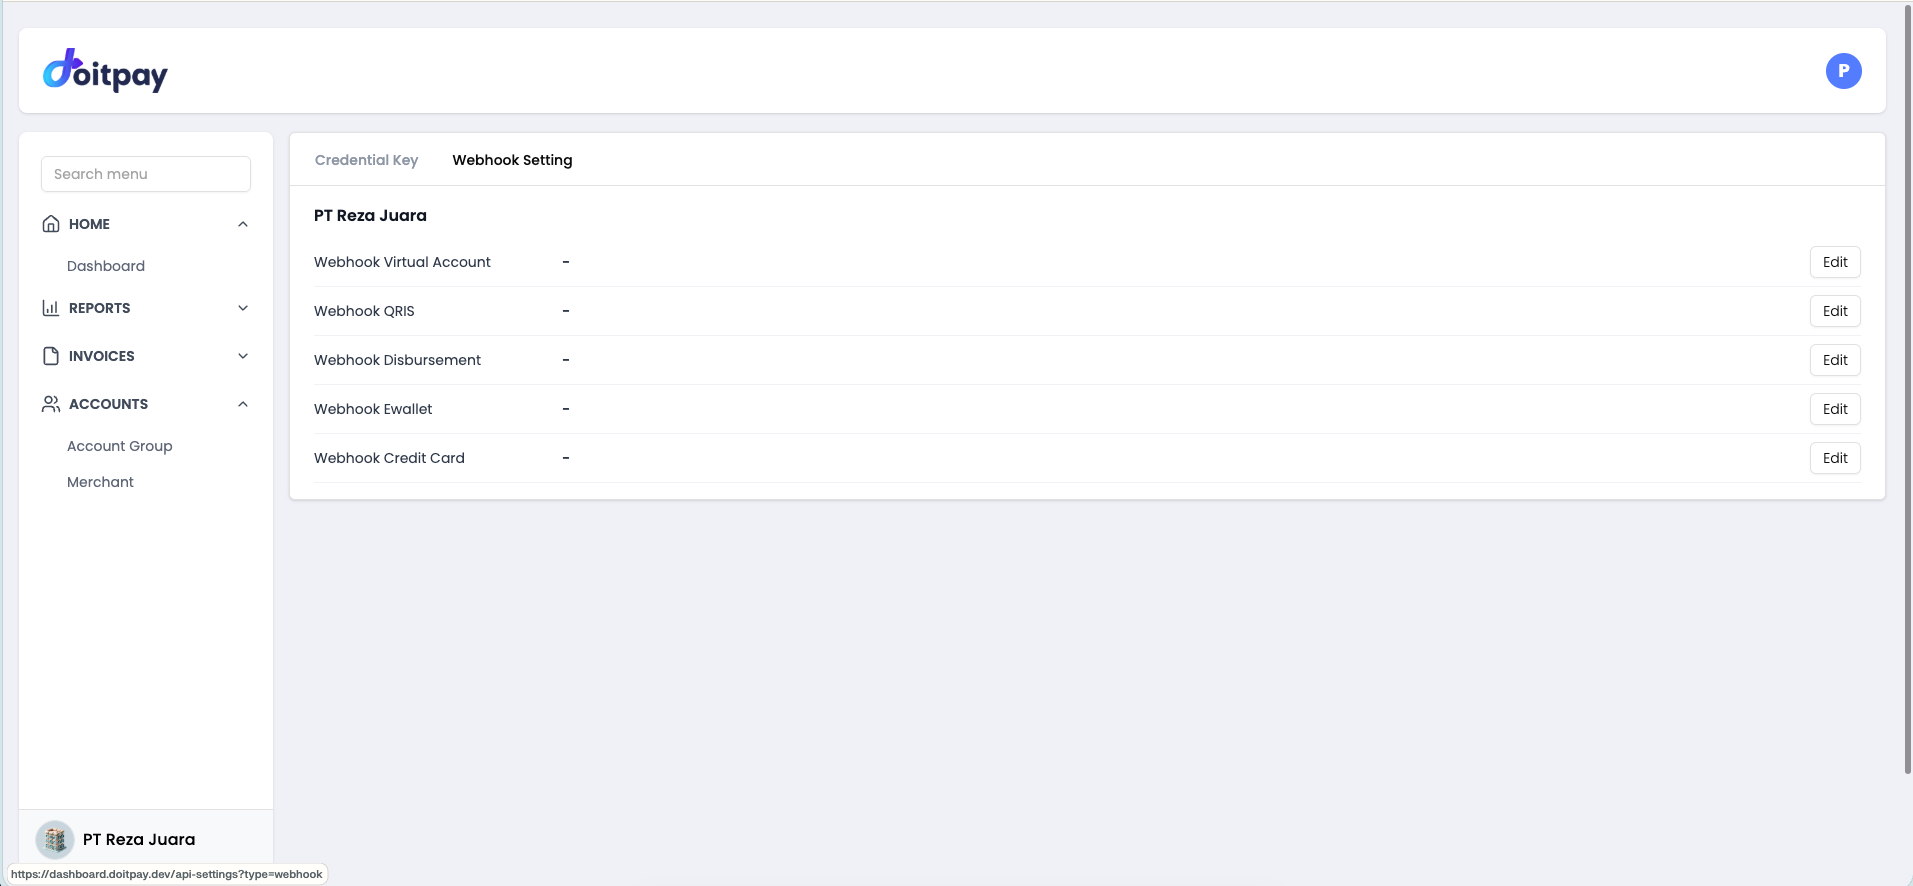
Webhooks let Doitpay push an update to your server the moment something happens, so your system does not have to poll.
| Webhook | Fires when |
|---|---|
| Webhook Virtual Account | A VA payment is received |
| Webhook QRIS | A QRIS payment completes |
| Webhook Disbursement | A disbursement is processed |
| Webhook Ewallet | An e-wallet payment completes |
| Webhook Credit Card | A credit card payment completes |
Click Edit next to a webhook to change its URL.
Tip
Point webhooks at an HTTPS endpoint that can accept repeated deliveries. Your handler should treat the same event arriving twice as normal and ignore the duplicate.
Common Questions
Q: I cannot type in the Business fields. Is something broken?
No. Business and bank details are locked in the dashboard because they control where your money settles. Contact support to change them.
Q: I invited a user but they are not in the list yet.
They appear in the users list only after they open the invitation email and complete registration. Until then look for them under Pending Invite User.
Q: My invitation link expired. Do I need to start again?
No. Find the row under Pending Invite User and click RE-INVITE EMAIL to send a fresh link.
Q: I changed my logo or header title but the checkout page looks the same.
Click Save on the Settings tab. Changes apply only after saving. If it still looks unchanged, clear your browser cache and reload the checkout page.
Q: I set SFTP delivery but no files are arriving.
Use Test Connection to confirm the credentials and host are correct, then check that the SFTP Upload Path exists and is writable by that user. Also confirm the Schedule Time has passed, since reports are sent on a schedule rather than instantly.
Q: Why can I not turn off some notifications?
Security related emails are locked on purpose so you keep an audit trail of account activity. The other groups can be changed freely.
Q: How many report recipients can I add?
Up to 2 primary recipients and up to 5 CC recipients.
Q: What is the difference between the profile menu and the tabs on the page?
They lead to the same place. The menu is a shortcut. Once you are on the page, use the tabs at the top to switch between Profile, Business, Settings, and Manage Notifications.
Best Practices
- Enable 2FA straight away: it removes the warning pill and protects your account
- Keep the users list tight: remove people who no longer need access, and check the list periodically
- Use the SOP panels: the Add User and Remove User procedures are written down, no need to ask
- Upload a square logo: exactly 160px x 160px keeps the checkout header clean
- Check the live preview before saving: confirm your branding on a sample order
- Keep critical notifications on: missing a settlement or disbursement alert costs more than the extra email
- Set up report delivery once: use email, SFTP, or both so your finance records stay current without manual downloads